In this step-by-step article I will go through setting up a VPN tunnel on the Draytek 2860n router – I will set-up the tunnel using the NordVPN service – I recommend you check them out – they’re awesome, take privacy seriously and you get 20% off if you use the link above 🙂 – however the instructions should be similar on other Draytek models and VPN service providers.
Using this article as a guide, you can set up your router to establish a VPN tunnel such that all traffic (or some as we’ll get on to later) on your network will pass through the VPN tunnel; thus doing away with the need to set up and configure separate clients for all your devices. You also get the advantage that guests on your network will seamlessly send traffic through the tunnel without any additional configuration.
Draytek Configuration – All Traffic Through VPN
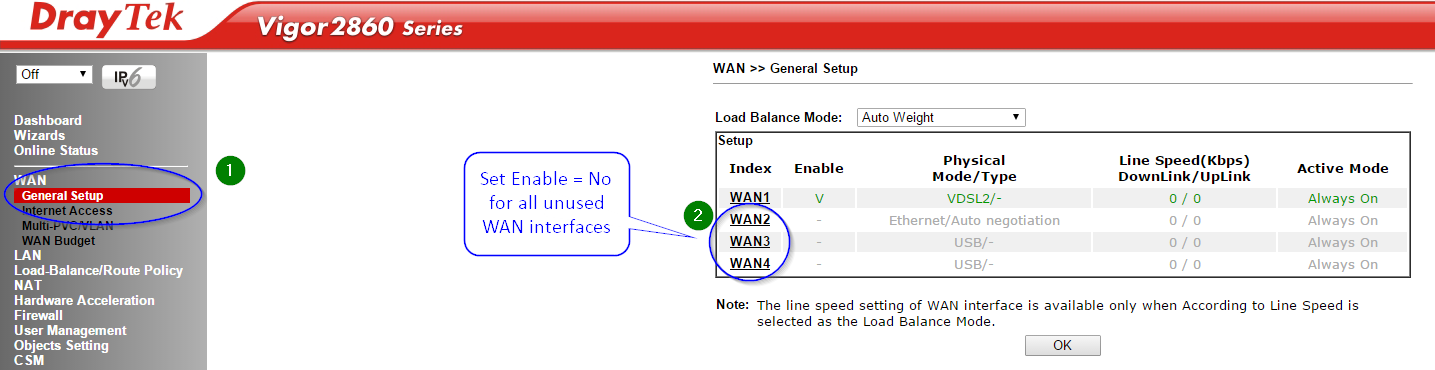
First we need to disable all unused WAN interfaces. If you don’t do this then you won’t be able to check the “Change default route to this VPN tunnel ( Only single WAN supports this )” option. Granted you can probably create a manual static route anyway but that’s not ideal.
Click General Setup under the WAN menu then disable all unused WAN links.
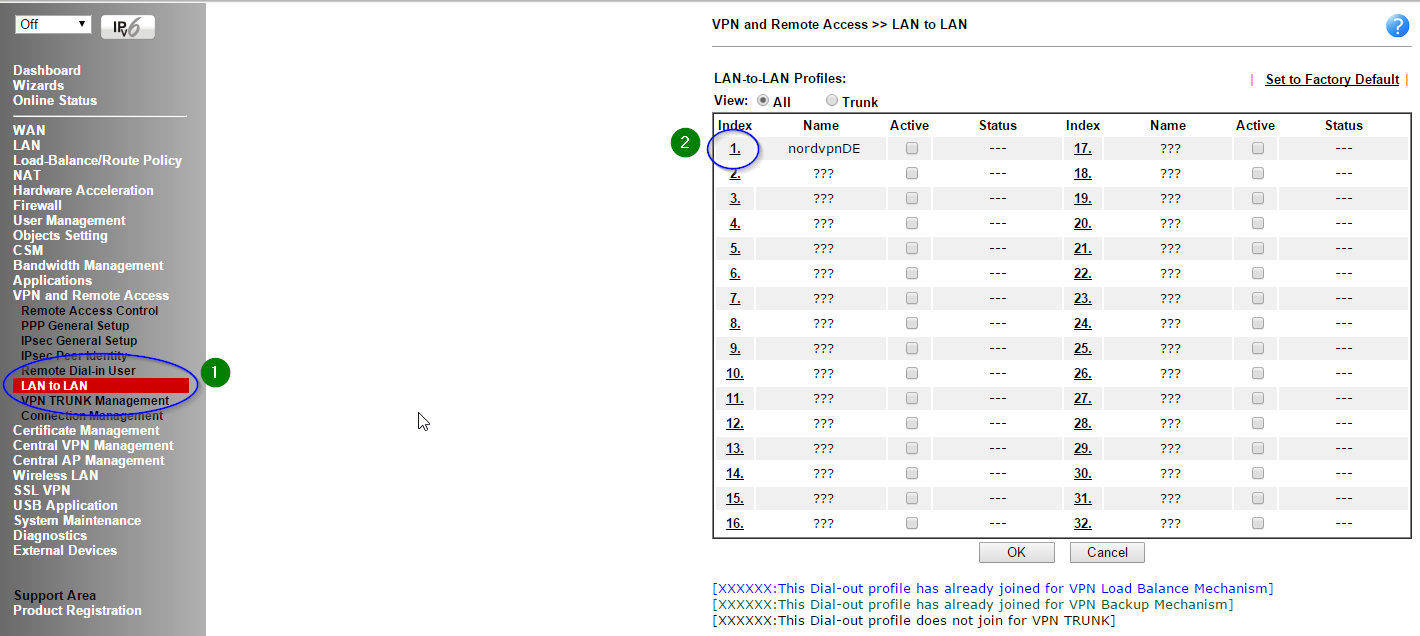
Next click on LAN to LAN under the VPN and Remote Access menu. Assuming you have no profiles already set-up then just click the first one. You can see that I already have one (currently offline)
Now it’s time to configure the main options. I will briefly go through the options below.
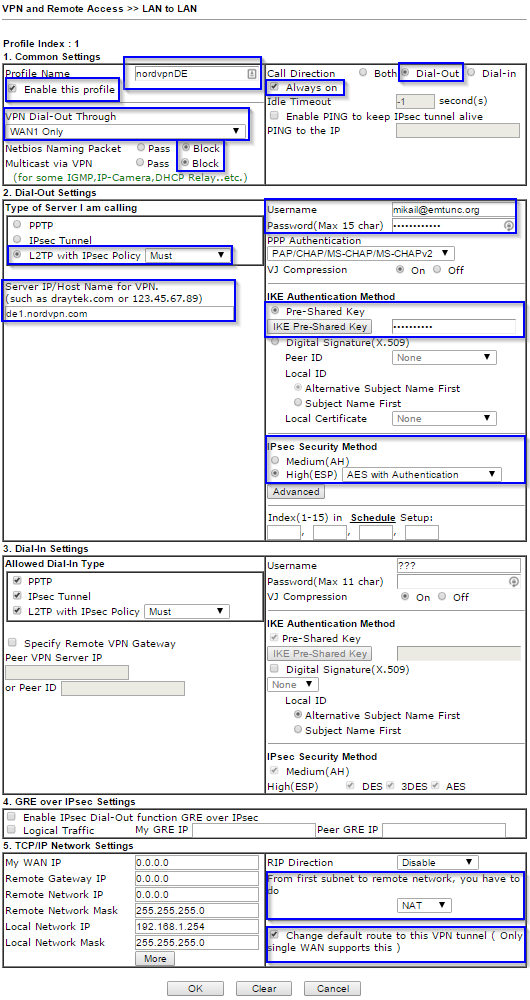
For profile name you can call it whatever you like. I called mine nordvpn followed by the location of the destination server.
VPN dial-out via WAN1 – for you it may not be WAN1 so make sure you select the right one (check first screenshot of this article).
Netbios and multicast are unlikely to be used so block these so you don’t send unnecessary traffic over the tunnel.
Call direction is self explanatory.
Always on makes the VPN tunnel ‘permanent’ otherwise it’ll timeout after a default inactivity period of 5 minutes. If you want to manually establish the VPN tunnel then you should uncheck this box.
Under dial-out settings, the username and password will be your NordVPN credentials. This would be a good time to ensure you have generated a secure password for your NordVPN account!
The type of server you are calling is L2TP with IPsec Policy = Must. This is the most secure and recommended method.
The sever you are connecting to is one of your choice – choose one from the many here.
The pre-shared key is nordvpn
Again, for maximum security, set the IPsec security method to High(ESP) AES with Authentication
From first subnet to remote network, you have to do NAT.
Change default route to this VPN tunnel ( Only single WAN support this ) you want to check this box to make all traffic go via the VPN.
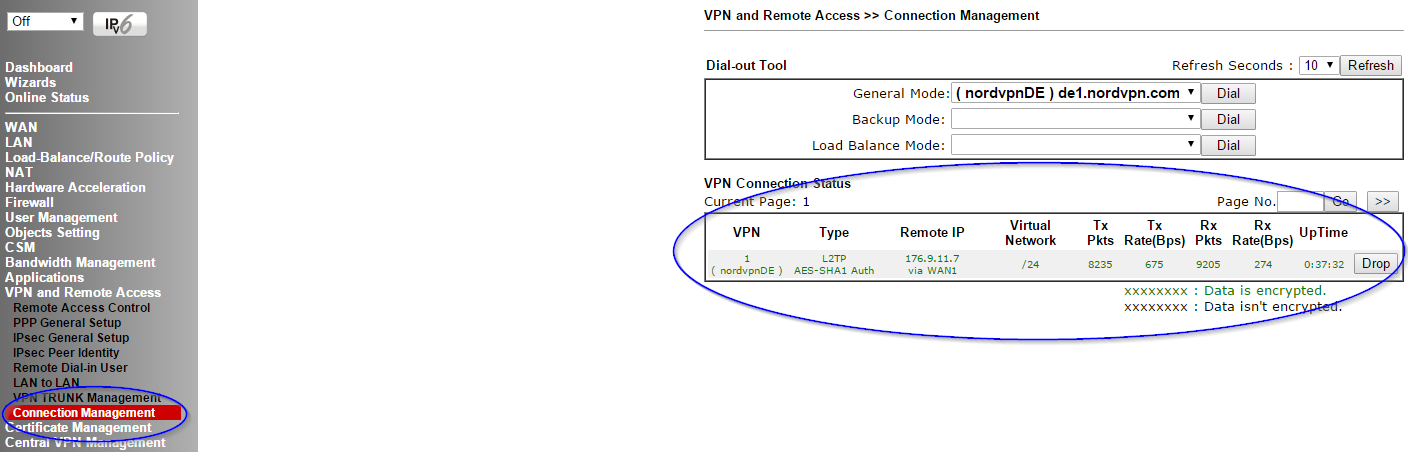
Click OK. This will establish the tunnel which can take a few seconds. Click Connection Management under the VPN and Remote Access menu to see the status of the tunnel. In my set-up you can see that the tunnel is up and traffic is passing through it.
Draytek Configuration – Advanced Configuration
Note: You will need firmware version 3.8.1 which was released on the 8th October 2015. Previous versions of firmware please follow the instructions here.
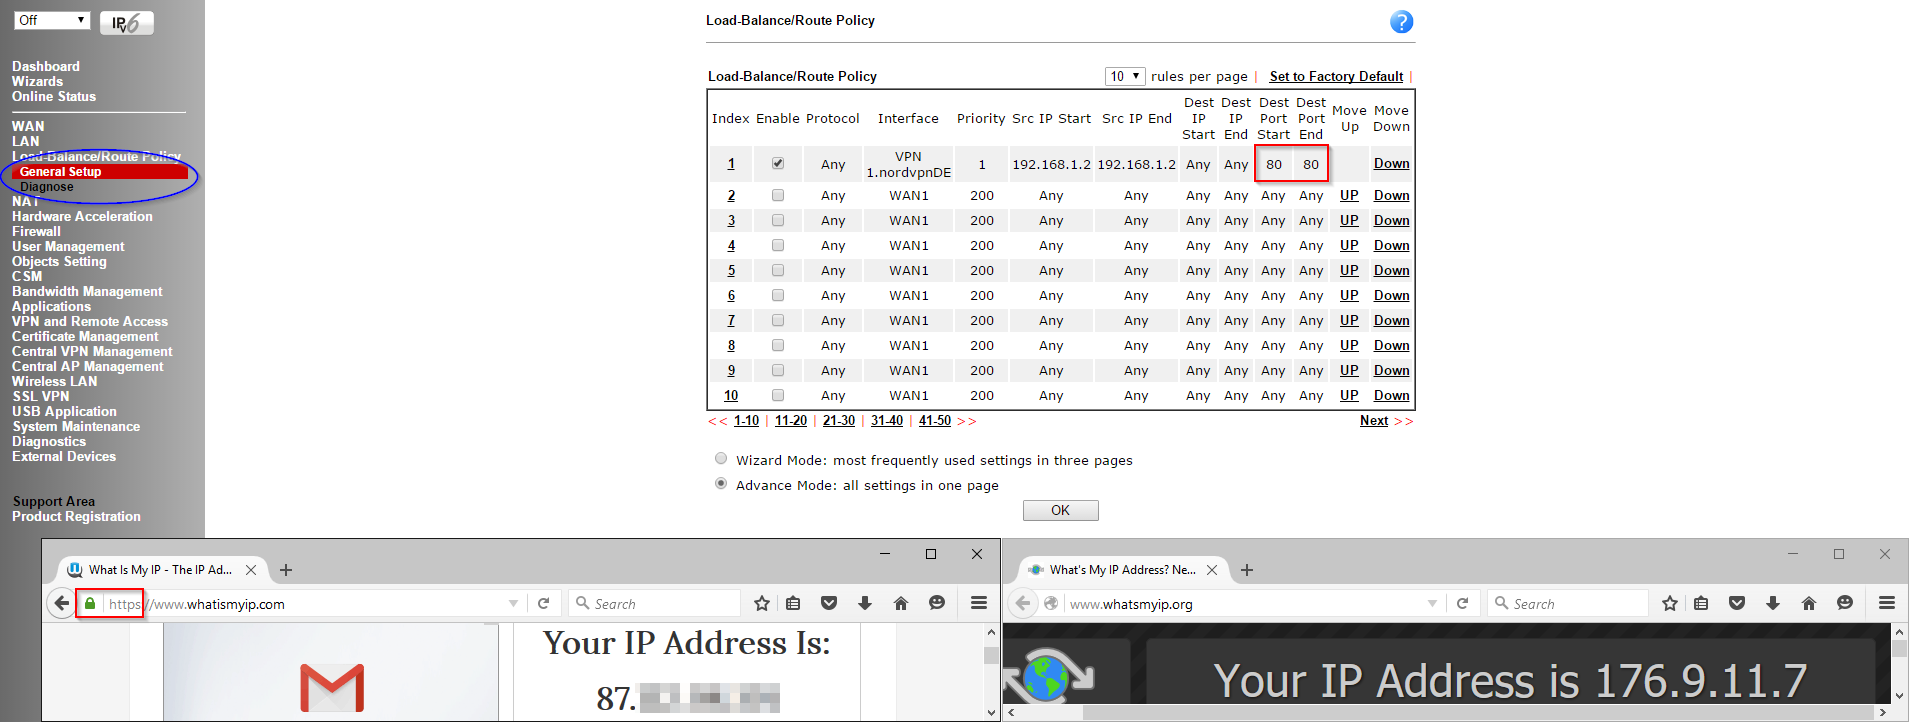
Route policies allow you to configure exactly which IP’s, subnets and ports will go over the VPN tunnel. This is really useful because you can configure things like all web traffic (80 and 443) go over the VPN tunnel but everything else goes out through your ISP as normal.
Before we start configuring the route policies you need to make sure you uncheck the “Change default route to this VPN tunnel ( Only single WAN supports this )” option in your LAN to LAN profiles otherwise the default route will always point to the VPN tunnel.
Click General Setup under the Load-Balance/Route Policy menu.
Click the first rule and configure a source IP range or subnet (enter the same IP twice if you just want one address) and any destination IPs or ports that you want to tunnel then select the Interface to be VPN.
In the example below I configured my machine (192.168.1.2) to forward HTTP traffic (80) over the VPN interface. You can see in the web browser windows that HTTPS traffic was (https/443) not affected by the change but the HTTP window on the right gets the tunnel IP. Cool right?
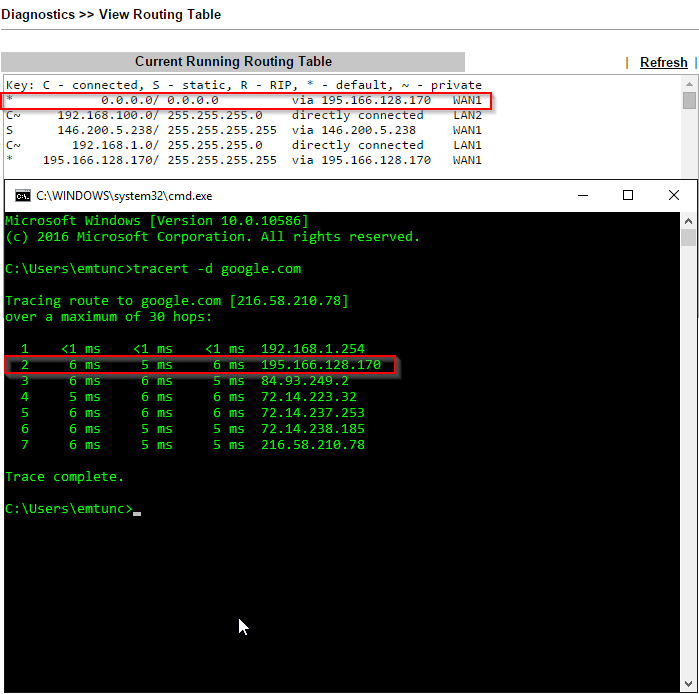
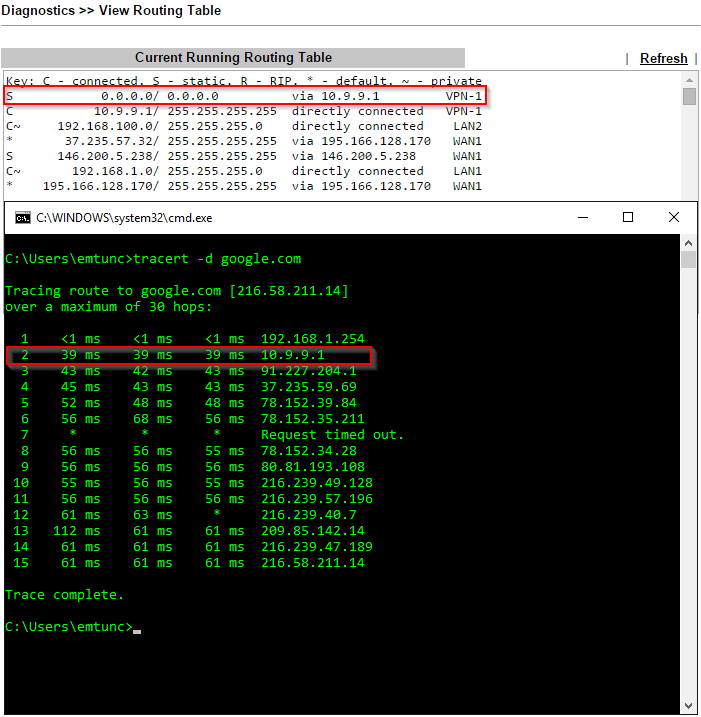
Confirming your default routes and testing them
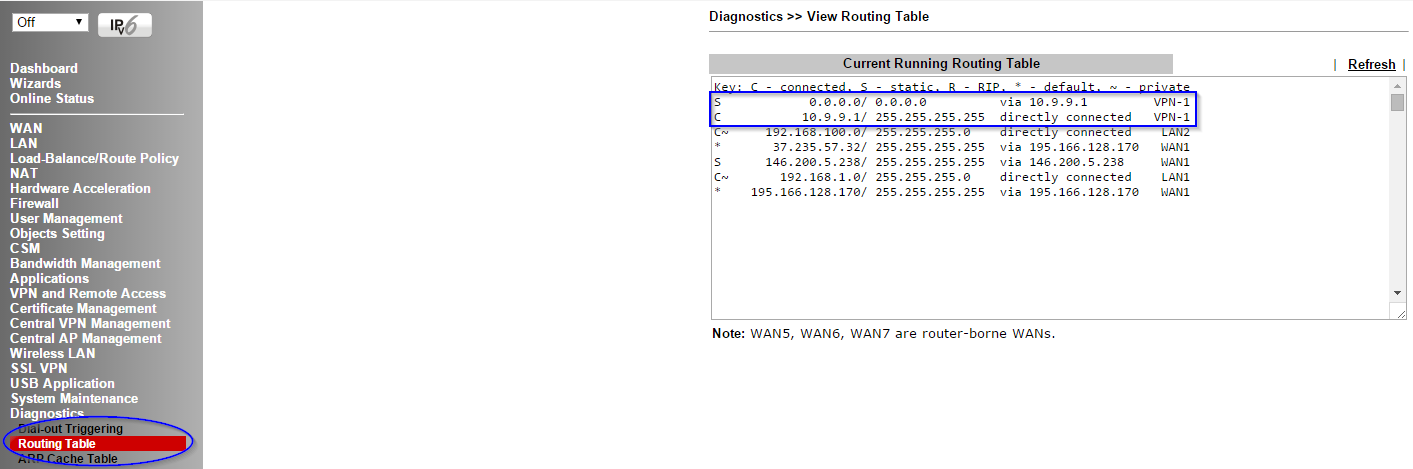
To make sure your default routes have been updated, click Routing Table under the Diagnostics menu. You should see the default route for all web bound traffic (0.0.0.0/0) being routed out the VPN tunnel (10.9.9.1 in this case).
To confirm, we can run a trace route with the tunnel up and one with the tunnel down. This will tell us the next hop address which should either be the ISP router or VPN tunnel interface.
Tunnel down (normal internet access without any VPN active):
Tunnel up (VPN tunnel established and default route automatically changed):
Things to keep in mind
- You should create multiple LAN to LAN profiles (in fact it’s a good idea to do so in case a server goes down for maintenance) with different names. By doing this you can easily toggle between tunnels.
Hope you found the article useful! Feel free to leave your comments or questions below.
3 replies on “Setting up a VPN Tunnel on Draytek – NordVPN”
Thank you for this, it helped me after I had struggled for a long time setting this up on my Draytek Vigor2925n.
Brilliant guide – appreciate it. I was wondering how to go about this given I have 4 site-to-site VPNs already setup and i needed to just route some ip address through NordVPN – have never looked at the “Load Balance/Route Policy” before and that was the key for me on my 2925Vn+. Thanks again
Works great with 3.8.1 firmware on Vigor 2860 Very useful, many thanks.
I see with 3.8.4 firmware you can now create route policies by dns name too – not that I’ve tested it yet.