In this brief guide I will show you how to set up Ninite to automatically update, install and remove applications on Workstations and Laptops on a Windows active directory domain.
What set-up this article covers (will almost certainly work with different set-ups)
- A Windows Server 2008 (R2) domain controller
- Windows 7 desktops and laptops
Setting up the Group Policies
In my organisation, we have an OU (Organisational Unit) for Desktops and Laptops. Now, there are a number of configurations you can set Ninite up with – the two I think merit a discussion is the /cachepath and /nocache switches.
The official definition of cached downloads is:
Ninite Pro automatically saves and reuses downloads in a NiniteDownloads folder it creates in the same directory as the Ninite .exe. Ninite Pro still checks for new versions of applications and downloads them if they are not already in the cache.
So there are two ways to go about this – one with a cache and one without. In our environment, I have set-up Desktops with a cache and laptops without a cache.
You may be asking your self why you’d want to mix the two? Why not use caching for both or not at all? Well, the answer to those questions is it really depends on how your network is set-up. For my organisation, employees are on customer site a lot or work from home where they may or may not be connected to the local network via a VPN connection. Even if they were connected to the local network from outside, the connection would be too slow to retrieve the cached downloads from the LAN so we have gone for the option of no download caching for laptops – this means that each and every laptop will download their updates directly from the internet. I’m happy with that as more times than not, they won’t be consuming the capacity of our internet connection for the downloads; they’d be using their own home wireless or other access point.
On the other hand, the workstations are fixed in the LAN via 100Mb/1Gb LAN links. From this perspective it makes more sense to use a local download cache rather than have all machines connect to the net to download their set-up files; consuming a lot of bandwidth and time.
How you want to configure Ninite is complete up to you – there are a bunch of command line switches you should probably familiarise yourself with before you begin.
- Go to the ‘Group Policy Management’ screen and create a new GPO for the ‘Desktops’ and ‘Laptops’ OUs.
- Open the GPO and navigate to ‘Computer Configuration — Preferences — Control Panel Settings — Scheduled Tasks’
- Create a new scheduled task. I called mine ‘Ninite Updater’
- The important tabs to pay attention to are Actions and CommonUnder Actions, we create 4 tasks. To save space I have provided a screenshot of the tasks. The first task created a folder on the C drive. I chose the root of the C drive as non-admin users will not have permissions to edit here. The second task copies over the ninite script from a file share directory to the newly created directory. The third task copies the NiniteOne executable so that Ninite can actually run. Finally the last task starts the update process.
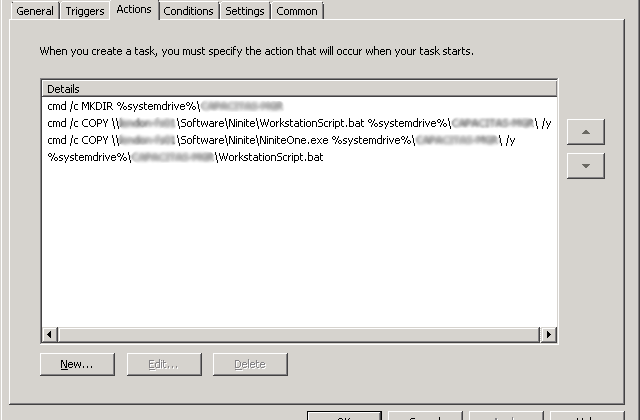
Ninite Desktop Actions Tab - Navigate to the Common tab and select Item-level targeting. Here you will select the OU group for Desktops/Laptops by going to New Item, Organisational Unit.
Now you’re done! All you have left to do is to upload the batch script (or Powershell if you prefer) to the file share so they can get copied over successfully!
Below is a replica of the script I use for the desktop machines.
# This line grabs the date and assigns it to the 'datestr' variable
for /F "tokens=1-4 delims=/- " %%A in ('date/T') do set datestr=%%C%%B%%A
# Run audit of the system before the update
%systemdrive%\NINITE\NiniteOne.exe /audit /silent %systemdrive%\NINITE\%computername%_auditBefore_%datestr%.csv
# Software requests go between these comments!
%systemdrive%\NINITE\NiniteOne.exe /select "iTunes" "7-Zip" Chrome Firefox FileZilla Flash "Flash (IE)" Malwarebytes "Notepad++" PuTTY Skype WinSCP Java "Java x64" /disableshortcuts /disableautoupdate /cachepath "\\FILESHARE\Software\Ninite\NiniteCache" /silent
# Uninstall certain software
%systemdrive%\NINITE\NiniteOne.exe /select WinRAR "Java 6" "Java x64 6" /uninstall
# Software requests go between these comments!
# After specific software installs above - we will now update all software and use a local cache. If your laptops are not in the office as much then you will most likely see a performance improvement if you use the /nocache option here
%systemdrive%\NINITER\NiniteOne.exe /allusers /updateonly /disableshortcuts /disableautoupdate /cachepath "\\FILESHARE\Software\Ninite\NiniteCache" /silent %systemdrive%\NINITE\%computername%_report_%datestr%.csv
# Run audit of the system after the update
%systemdrive%\NINITE\NiniteOne.exe /audit /silent %systemdrive%\NINITE\%computername%_auditAfter_%datestr%.csv
# Move the csv logs we created to a location on the file share
MOVE %systemdrive%\NINITE\*.csv "\\FILESHARE\Internal\Internal IT\Logs\Ninite\Workstation Scheduled Task"
# Exit with code 0
exit 0
I have left out some small details on how I configured the scheduled tasks but that is because there are many ways of doing this and I have left it up to the reader to decide.
If you have any problems with this approach let me know and I will be happy to answer!
One reply on “Updating Third Party Software on Domain Workstations and Laptops with Ninite Pro”
Great Post, Thanks for the sharing your script. Save me a whole lotta time.